Blinky, your “Hello World!”, on STM32F303 Discovery
Objective
Learn how to use packages from a default application repository of Mynewt to build your first Hello World application (Blinky) on a target board. Once built using the newt tool, this application will blink the LED lights on the target board.
Create a project with a simple app that blinks an LED on the STM F303 discovery board. In the process import some external libraries into your project. Download the application to the target and watch it blink!
What you need
Discovery kit with STM32F303VC MCU
Laptop running Mac OSX.
It is assumed you have already installed newt tool.
It is assumed you already installed native tools as described here
Also, we assume that you’re familiar with UNIX shells. Let’s gets started!
Create a project
Create a new project to hold your work. For a deeper understanding, you can read about project creation in Get Started – Creating Your First Project or just follow the commands below.
If you’ve already created a project from another tutorial, you can re-use that project.
$ mkdir ~/dev
$ cd ~/dev
$ newt new myproj
Downloading project skeleton from apache/incubator-mynewt-blinky...
Installing skeleton in myproj...
Project myproj successfully created.

$ cd myproj
Note: Don’t forget to change into the myproj directory.
Install dependencies
Now you can install this into the project using:
$ newt install -v
Downloading repository description for apache-mynewt-core... success!
...
apache-mynewt-core successfully installed version 0.7.9-none
...
Downloading repository description for mynewt_stm32f3... success!
Downloading repository mynewt_stm32f3
...
Resolving deltas: 100% (65/65), done.
Checking connectivity... done.
mynewt_stm32f3 successfully installed version 0.0.0-none
Create targets
Create two targets to build using the stmf3 board support package and the app blinky example from mynewt. The output of these commands are not shown here for brevity.
The first target is the application image itself. The second target is the bootloader which allows you to upgrade your mynewt applications.
$ newt target create stmf3_blinky
$ newt target set stmf3_blinky build_profile=optimized
$ newt target set stmf3_blinky bsp=@apache-mynewt-core/hw/bsp/stm32f3discovery
$ newt target set stmf3_blinky app=apps/blinky

$ newt target create stmf3_boot
$ newt target set stmf3_boot app=@mcuboot/boot/mynewt
$ newt target set stmf3_boot bsp=@apache-mynewt-core/hw/bsp/stm32f3discovery
$ newt target set stmf3_boot build_profile=optimized

$ newt target show

targets/stmf3_blinky
    app=apps/blinky
    bsp=@apache-mynewt-core/hw/bsp/stm32f3discovery
    build_profile=optimized
targets/stmf3_boot
    app=@mcuboot/boot/mynewt
    bsp=@apache-mynewt-core/hw/bsp/stm32f3discovery
    build_profile=optimized
Build the target executables
To build the images, use the newt build command below.
$ newt build stmf3_blinky
   ...
Archiving stm32f3discovery.a
Linking blinky.elf
App successfully built: ~/dev/myproj/bin/stmf3_blinky/apps/blinky/blinky.elf

$ newt build stmf3_boot
Compiling log_shell.c
Archiving log.a
Linking boot.elf
App successfully built: ~/dev/myproj/bin/stmf3_boot/apps/boot/boot.elf
Sign and create the blinky application image
You must sign and version your application image to download it using
newt. Use the newt create-image command to perform this action. Here
we assign this image an arbitrary version 1.2.3.
$ newt create-image stmf3_blinky 1.2.3
App image successfully generated: ~/dev/myproj/bin/stmf3_blinky/apps/blinky/blinky.img
Build manifest:~/dev/myproj/bin/stmf3_blinky/apps/blinky/manifest.json
Configure the hardware
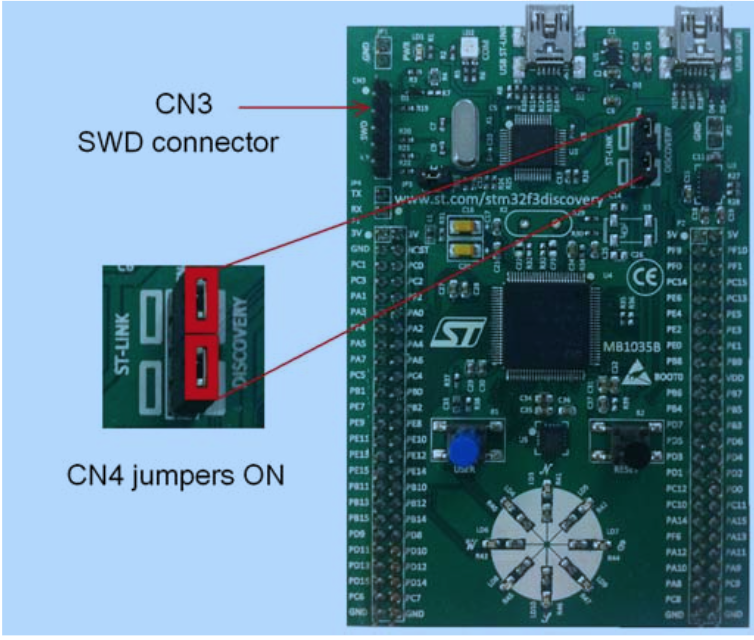
The STM32F3DISCOVERY board includes an ST-LINK/V2 embedded debug tool interface that will be used to program/debug the board. To program the MCU on the board, simply plug in the two jumpers on CN4, as shown in the picture in red. If you want to learn more about the board you will find the User Manual at http://www.st.com/st-web-ui/static/active/jp/resource/technical/document/user_manual/DM00063382.pdf

Download the Images
Use the newt load command to download the images to the target
board.
$ newt -v load stmf3_boot
$ newt -v load stmf3_blinky
Watch the LED blink
Congratulations! You have built, downloaded, and run your first application using mynewt for the stm32f3 discovery board. One of the LEDs on the LED wheel should be blinking at 1 Hz.
Want more?
Want to make your board do something a little more exciting with the LEDs? Then try making the modifications to the Blinky app to make it a pin wheel app and you can light all the LEDs in a pin-wheel fashion.
We have more fun tutorials for you to get your hands dirty. Be bold and try other Blinky-like tutorials or try enabling additional functionality such as remote comms on the current board.
If you see anything missing or want to send us feedback, please do so by signing up for appropriate mailing lists on our Community Page
Keep on hacking and blinking!
